NOTICE
Risk of function faults!
Missing electrical contact by isolating screws or washers!
Use metal screws on the metal plate.
The metal plate must be included into the grounding concept of the plant.
Do NOT use insulating washers!
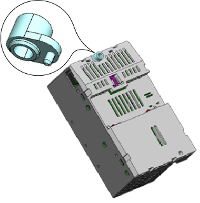
One TA543 wall mounting accessory is needed per processor module.
-
Snap in the TA543 at the back side of the processor module.
-
Fasten the processor module with two screws (diameter: 4 mm) to the metal plate.