


Using OPC UA Information Models
The OPC UA information models provide plant information according to the OPC UA standard. This plant data contains both data and metadata, such as data origin, data quality, and data cross-connections. OPC UA-based plants can therefore be connected and analyzed faster.
In plant and mechanical construction, there are several sector-specific OPC UA information models. For example, the Companion Specification EUROMAP77 is an information model for plastics and rubber machinery.
An information model consists of different objects that contain meta-information, runtime information, and user data, such as process variables.
Requirements:
-
A CODESYS project is open.
-
A controller with integrated OPC UA Server functionality has been added to the project.
-
Click “Tools OPC OPC UA Information Model Repository”.
The “OPC UA Information Model” dialog opens.
The information models with the URI
http://opcfoundation.org/UA/andhttp://opcfoundation.org/UA/DI/are already installed by default. -
To install the OPC UA information model that you need in your project, select it and click “Install”.
-
In the “Select OPC UA Information Model” dialog, select the information model file
*NodeSet2.xmlfrom the file directory and click “Open”.Now the selected OPC UA information model is displayed in the “OPC UA Information Model Repository”.
-
Add a
 “Communication Manager” object to the application of your CODESYS project.
-
Add an ⮫ OPC UA Information Model (
 ) object to the
“Communication Manager”.
) object to the
“Communication Manager”.
-
In the “Add OPC UA Information Model” dialog, specify a name for the information model according to IEC 61131-3 and select the desired information model in the “Information Model URI” list box. The list box shows all OPC UA information models from the OPC UA information model repository. Then click “Add”.
In the “Devices” view, the
publishing object, for which you have specified a name in the previous step, is inserted
and the selected  “Information Model” below it.
The publishing object is opened in the editor.
-
In the next steps, select those objects and data types from the OPC UA information model which you want to use in your CODESYS application. To do this, first open the
“Information Model” in the editor.
The type declarations of the OPC UA information model are displayed on the left side.
-
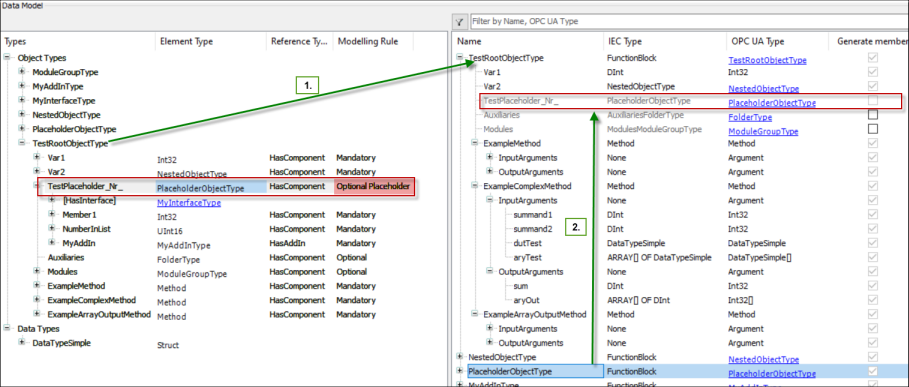
Add the ⮫ OPC UA type declarations desired for your CODESYS application by dragging them from the left area to the right area. For all types with the “Modelling Rule” as “Mandatory”, a corresponding IEC member is generated for the application later when the IEC declarations are generated. For the “Modelling Rule” as “Optional”, in the right area you can activate an IEC member to be generated for this type as well.
-
For OPC UA types with the modelling rule as “Optional Placeholder”, in the right area you can drag and drop another corresponding IEC type to insert it.
Example:
-
When you have mapped all desired OPC UA types to IEC, click the “Generate IEC declarations” button.
The generated IEC members are visible, for example in the “OPC_UA_Symbols Objects” folder, and can be used in the application. These members are available in the Input Assistant for the implementation of the POUs in your application.
-
When arrays are generated, in the declarations you need to define the upper limits for the arrays because this information is not included in the installed information model file
*NodeSet2.xml. -
In the next steps, you configure the OPC UA types which should be published in an OPC UA Client. To do this, in the device view double-click the
OPC UA publishing object.
-
In the OPC UA publishing editor that just opened, you can generate new instances for the POUs which you have generated in the
“Information Model”. Or you can use instances which you have already declared in your application in
PRGs and GVLs.
-
To create a new instance, click “Generate New Instance”.
-
In the “Create New Instance” dialog, select the “IEC Type” from the list box and click “OK”.
An instance of the selected IEC type is generated and inserted in the editor. You can double-click the automatically generated name “inst_n” to change it.
-
To search for instances which have already been declared in the application, click “Search for Mapped Instances”.
-
In the editor, in the “Root Node” list box, select the directory where the instances should be displayed on the OPC UA Client. The directories that can be selected depend on the OPC UA companion specification.
-
To publish these instances on an OPC UA Client, click “Online Login”.
-
When the application has been successfully downloaded to the controller, start the application.
-
Start the OPC UA Client.
In the OPC UA Client, the instances are displayed which you have selected in the previous steps in the OPC UA publishing editor.
-
Mapping of OPC UA Types to IEC Types
-
Editing the Type Mapping