


Using Script list
Script list allows Python scripts to be registered for automatic execution based on event triggers. Users can choose an event from a selected group of events (e.g. Before Compilation, After Code Generation etc.) and have it give the signal to trigger a chosen, custom “Python-Script-Object” within the Automation Builder.
With script-list, scripting-based workflows can be automated even further.
Working with script list
Script lists can be added and stored as objects in the Automation Builder project. Script lists contain information and references about existing script objects within the same project.
Adding a script list to the project
-
In the device tree, click on the project-node or a CPU-node (only these types of nodes are permitted to hold script lists) and click [Add object].
-
Under the Scripting category select “Script list (auto execution) Add object”.
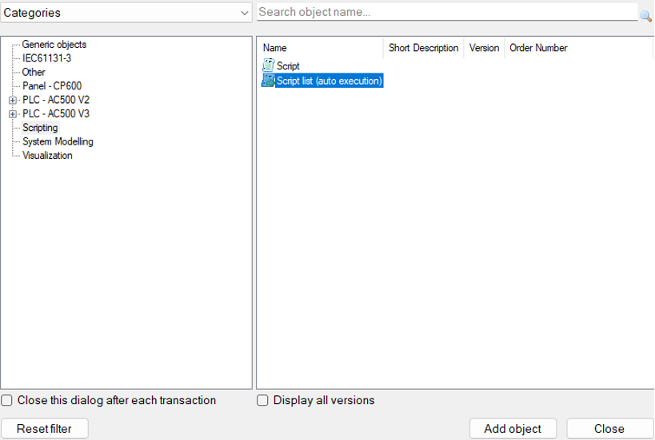
Now the “Script-list” object has been added.
Usage
-
Double click the Script list (auto execution) node to open its editor.
Now you’re presented with a table containing two columns “Script to execute” and “Event to trigger execution”.
-
Select the first column by clicking a free cell there.
You will be presented with a combo box containing all available scripts to list. A script is considered available for a script list, when the script and the script list share the same CPU-Node. (A script object which is directly under the project node can be accessed by a script list object regardless).
Note that you can add as many scripts as you like, there will always be a blank row at the end of the table where you can add new values.
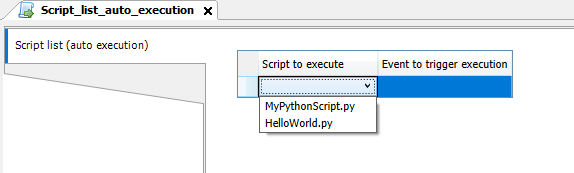
-
After this selection, you can move to the second column (“Event to trigger execution”) where you can select an event on which you want your script to be triggered. You can also choose not to add an event, but this will result in the script being assigned the event “none” by default. It will not be triggered by the script list.
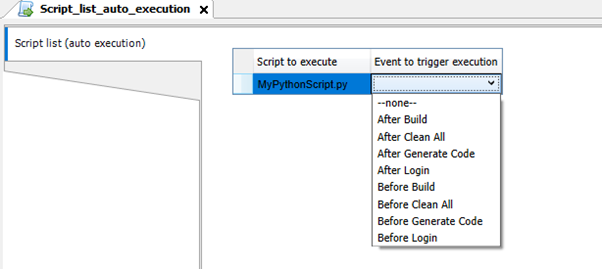
-
You can change both column entries at any time by simply clicking on their entries. A combo box will appear, giving you more options. You can swap one script for another, or assign a different event.
-
You may delete a table entry by selecting the corresponding row and pressing [Delete] on your keyboard.
-
Multiple scripts assigned to the same event will be triggered in the order specified by the table. This order is from top to bottom. You can change this order by dragging and dropping the corresponding rows. You can drag a row by clicking and holding the row header.
Your scripts which have been added to the “Script-list” are now set up for automatic execution upon the trigger of their assigned event.
Additional Information
You can assign the same script to the script list as many times as you would like. Even the same events can be chosen for each assignment.
-
The Script list stores only references to script objects that already exist in the project. This is useful because the location of a script object is important in many application scenarios. However, these objects must still exist. Assigning a script object to the script list and then deleting that script object will result in an empty reference to that object that will be ignored and must be removed manually.
-
You can add multiple script lists to your project (although this is not recommended since a single instance can perform the same tasks as multiple). However, this will add another rule to the execution order, where the top-level script list will now execute ALL of its contents before the next script list begins executing its scripts.