


Generating a certificate for the CODESYS OPC UA Server
In order to encrypt data and exchange it with the client safely, the server needs a certificate that the client must classify as "trusted" when a connection is established for the first time.
Requirement: The active path to the controller is set.
-
Install the CODESYS Security Agent add-on.
-
Click “View Security Screen”.
-
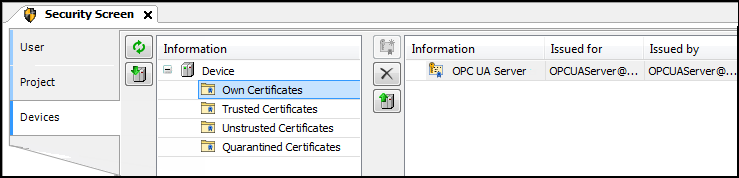
Select the “Devices” tab.
-
In the view on the left, select the controller.
In the right view, all services of the controller which require a certificate are displayed.
-
Select the “OPC UA Server” service.
-
Create a new certificate for the device. To do this, click the
 icon.
icon.
The “Certificate Settings” dialog opens.
-
Define the certificate parameters and click “OK” to close the dialog.
The certificate is created on the controller.
-
Restart the runtime system.
Configuration of the trusted CA for OPC UA Server certificates
When OPC UA Client certificates are generated via a trusted certification authority (CA = Certificate Authority), this CA must be configured as a trusted CA in the OPC UA Server. To do this, the trusted certificate authorities (CA) must be installed under "Trusted Certificates".
To install certificate revocation lists (CRL: Certificate Revocation List) of the CAs, the following steps are required:
-
Transfer of the CRLs per file transfer into the cert/import directory
-
Execution of the PLC shell command "cert-importcrl"
In case the client certificates are not signed directly by the trusted CA, but rather have a longer chain, then the certificates of the intermediate CAs have to be installed separately. They must be transferred to the directory "OPCUAServer/Intermediate" via file transfer. After the transfer, these certificates are automatically used by the OPC UA Server.
In order to also set up an encrypted access to the OPC UA Server purely for browsing, a certificate can be created solely for this purpose in the ⮫ Communication Settings dialog of the data source manager.